Basic ESP32-C3 RGB LED Controller

Tell us about your projects. Update us regularly.
Post Reply
parkview
Guru Maker
Posts: 603
Joined: Tue Jun 24, 2014 8:25 pm
Location: Busselton
Contact:

Basic ESP32-C3 RGB LED Controller

Post by parkview » Wed Sep 07, 2022 9:45 am

A while back I did a ESP32 based simple RGB LED controller, but there was no onboard UART, so it had to be programmed via an external USB to UART cable. Now that the ESP32-C3 MCU is available and has been ported into Arduino, I thought it was time to spin out a version based on the C3. The C3-Mini is about two thirds of the size of a ESP32, so using a sprinkling of 0603 and 0402 sized components, I have managed to shrink the PCB down by about a third smaller than the previous controller board.

Features:
  • ESP32-C3 MCU
  • USB C connector which provides more current
  • Haptic motor connector
  • two strands of RGB LEDs, ie: WS2812 or a derivative
  • onboard ambient light sensor
  • side activated Mode switch
  • extra user/boot mode switch
  • provision for a i2C based OLED screen
  • onboard Red/Green user LEDs
This is a colorful and fun project board to play around with:
IMG_1827.jpg
IMG_1827.jpg (105.69 KiB) Viewed 15928 times

parkview
Guru Maker
Posts: 603
Joined: Tue Jun 24, 2014 8:25 pm
Location: Busselton
Contact:

Re: Basic ESP32-C3 RGB LED Controller

Post by parkview » Sun Feb 05, 2023 10:15 am

This version of the RGB (WS2812) LED Controller even smaller, just 35mm x 26mm. It has the same ambient light simple photo transistor sensor as the 2-Port board, but the RGB power output is switched via a MOSFET. This means I can isolate the boards power from the RGB light strip and run the strip via external power. All under software control and has a smaller footprint than using a 0.1" header ping jumper. The haptic motor has been dropped, as there was no room for the connector. All of this and still on a 2 layer PCB, so it will be cheap to panelise if I want lots of these later on. All the passive components are 0402 sized. Getting all the text onto the PCB was a challenge:
Basic_1-Port_Controller-Annotated.png
Basic_1-Port_Controller-Annotated.png (95.08 KiB) Viewed 15348 times

All the GPIO info need to program the board is on the backside:
Basic_1-Port-v2.1_backside.png
Basic_1-Port-v2.1_backside.png (139.94 KiB) Viewed 15348 times

I program it in Arduino via Visual Source Code PlatformIO plugin and it uploads to the board via the USB C connector. Very easy and fun to play with.

When is a project ever finished? There is a small blank area to the right hand side of the USB connector. Might be a perfect spot for a Hall Effect sensor? That way perhaps you could switch modes via a small magnet, ie: mounted in a ring?

You can find the 1 Port PCB design files and example code here: https://gitlab.com/parkview/ESP32-C3_1- ... Controller

parkview
Guru Maker
Posts: 603
Joined: Tue Jun 24, 2014 8:25 pm
Location: Busselton
Contact:

Re: Basic ESP32-C3 RGB LED Controller

Post by parkview » Wed Jun 28, 2023 9:26 pm

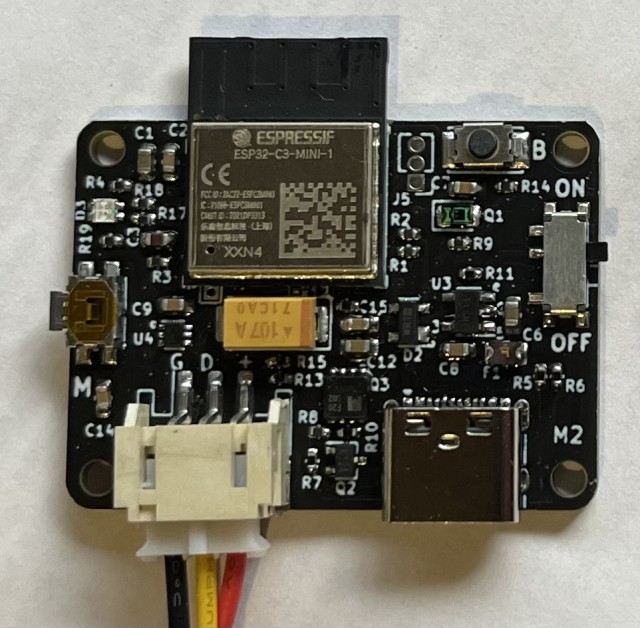
Ok, the mag sensor didn't make it onto the next design version, but I did add a voltage divider that measures the voltage on the RGB LED string. If the MOSFET sending power to the LED string is switched off, then I should read 0 volts on the RGB LED string, but low and behold, I still measure a reduced voltage, from memory it might have been 2.4V!! How is this. VCC has 0V being sent onto it, but there is still a considerable voltage on the LED string?

I think it might be the data voltage being leaked up to VCC? Regardless, it's not 3.3V, so on the v2.2 PCB design, I added a 100k-100k voltage divider across the VCC line. I can check if there is a 3.3V or 5V voltage on the line before I switch the PCB USB 5V onto the RGB LED VCC line. Using the USB 5V would enable up to 25 odd LEDs at full brightness, or more it partial brightness.

Playing around with a variable resistor inline with the photo-transistor, I found I needed a 100K ohm resistor to give enough sensitivity to measure low levels of light and contrast against bright light. All in all, it works well and I am happy with it.
RGB_LED-Controller_v2.2.jpg
RGB_LED-Controller_v2.2.jpg (107.57 KiB) Viewed 14922 times

Now this is only a two layer PCB, so it relatively cheap to panelise and make up. There is a tiny bit of PCB real estate left and a spare ADC1 pin available, but I would need to bump up to 4 layers to fit the magnetic sensor onto the board. Maybe one day.

Post Reply